插桩技术及Pin工具
0x00:插桩技术
插桩 ( Instrumentation )是一种测试程序性能、检测错误和获取程序执行信息的技术。在保证被测程序原有逻辑完整性的基础上,通过在程序中插入一些探针(probe),即添加一些代码,获得程序的控制流和数据流信息。
举个🌰:通过手动或者自动化工具,在函数执行前和后分别插入读取计时器的代码,便可获取函数的执行时间。
- 根据插桩对象不同,分为源代码插桩和二进制插桩;
- 根据插桩粒度不同,分为指令级别插桩、函数级别插桩、基本块级别插桩、边界级别插桩;
- 根据分析方法不同,分为静态插桩和动态插桩;
常见的动态二进制插桩框架平台:Pin、DynamoRIO和Frida。
下面会对Pin工具进行简单的介绍。
0x01:Pin工具:
Pin 是 Intel 公司研发的一个动态二进制插桩框架,通过该架构可以在二进制程序运行过程中插入各种函数,以监控程序每一步的执行和获取程序运行信息。
Pin 具有以下优点:
- 易用:使用动态插桩,不需要源代码、不需要重新编译和链接。
- 可扩展:提供了丰富的 API,可以使用 C/C++ 编写
插桩工具(即Pintool) - 多平台:1)支持 x86、x86-64、Itanium、Xscale;2)Windows、Linux、OSX、Android
- 鲁棒性:1)支持插桩现实世界中的应用:数据库、浏览器等;2)支持插桩多线程应用;3)支持信号量;
- 高效:在指令代码层面实现编译优化;
四种插桩粒度 ( Instrumentation Granularity ):
- 指令级插桩 ( Instruction instrumentation )
- Trace instrumentation:Pin guarantees that a trace is only entered at the top, but it may contain multiple exits.
- Image instrumentation
- Routine instrumentation
官方文档中提到了这四种插桩粒度(模式),这里看得有点迷迷糊糊,所以想要更多的了解,可以去文档中看看。
Pin的整体架构:
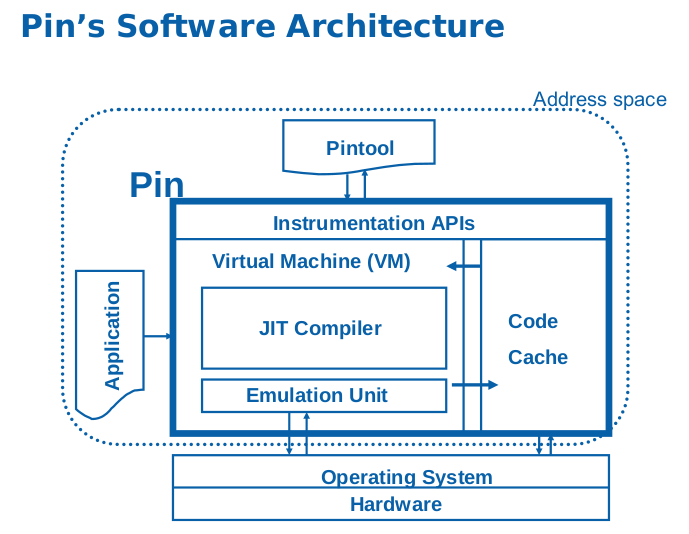
从图中的架构可以看出,Pin可以分为三大部分:
- Instrumentation APIs:在编写Pintool时,供Pintool调用的接口;
- VM:用于编译并执行程序。其中,JIT 编译器负责对二进制文件中的指令进行插桩和编译,Emulation Unit 用来处理系统调用;
- Code Cache:用于存储经过VM编译后的代码, Code Cache中的代码是真正用于执行的,原目标文件中的代码不会被执行;
首先,从官网下载Pin工具压缩包。
(注:因为制作Pintool需要使用make命令,所以在Windows环境下,需要配置好支持make的工具,比如官方文档中提到的”Gygwin”)
压缩包解压后,工具根目录下有个名为pin的可执行程序,这个是用来结合Pintool进行插桩的。
Pintool是一个动态链接库,在使用Pin时需要通过参数载入Pintool对选定的二进制文件进行插桩。
在./source/tools/ManualExamples中,官方提供了很多的示例代码。源文件是C++文件,我们可以将其make(相当于是编译)成.so文件,然后使用pin程序结合.so文件对目标程序进行插桩操作。
############################
# Pintool的制作

# 跳转到对应目录
cd source/tools/ManualExamples

# 将ManualExamples目录下的所有工具源文件进行编译, 然后放到obj-ia32目录中
make all TARGET=ia32

# 将ManualExamples目录下的所有工具源文件进行编译, 然后放到obj-intel64目录中
make all TARGET=intel64

# 对某个特定的示例(inscount0.cpp)编译并执行,目标文件为官方默认指定的
make inscount0.test TARGET=intel64

# 对某个特定的示例编译,但不执行
make obj-intel64/inscount0.so TARGET=intel64

# 对某个特定的示例编译,但不执行(IA-32架构)
make obj-ia32/inscount0.so TARGET=ia32

# 注:关于ia-32与intel64的使用区别了解不够,不过要与目标程序的位数对应

##################################
#使用pin程序来进行插桩操作

# 对/bin/sh进行插桩,执行后获取的信息默认存放在inscount.out
../../../pin -t obj-intel64/inscount0.so -- /bin/ls

# -o参数用于指定结果存放的位置
../../../pin -t obj-intel64/inscount0.so -o inscount0.log -- /bin/ls通过浏览incount0.cpp代码,可以大概了解的编写规则。
/*
 * Copyright (C) 2004-2021 Intel Corporation.
 * SPDX-License-Identifier: MIT
 */

#include <iostream>
#include <fstream>
#include "pin.H"
using std::cerr;
using std::endl;
using std::ios;
using std::ofstream;
using std::string;

ofstream OutFile;

// The running count of instructions is kept here
// make it static to help the compiler optimize docount
static UINT64 icount = 0;

// This function is called before every instruction is executed
VOID docount() { icount++; }

// Pin calls this function every time a new instruction is encountered
VOID Instruction(INS ins, VOID* v)
{
    // Insert a call to docount before every instruction, no arguments are passed
    INS_InsertCall(ins, IPOINT_BEFORE, (AFUNPTR)docount, IARG_END);
}

KNOB< string > KnobOutputFile(KNOB_MODE_WRITEONCE, "pintool", "o", "inscount.out", "specify output file name");

// This function is called when the application exits
VOID Fini(INT32 code, VOID* v)
{
    // Write to a file since cout and cerr maybe closed by the application
    OutFile.setf(ios::showbase);
    OutFile << "Count " << icount << endl;
    OutFile.close();
}

// Print Help Message
INT32 Usage()
{
    cerr << "This tool counts the number of dynamic instructions executed" << endl;
    cerr << endl << KNOB_BASE::StringKnobSummary() << endl;
    return -1;
}

int main(int argc, char* argv[])
{
    // Initialize pin
    if (PIN_Init(argc, argv)) return Usage();

    OutFile.open(KnobOutputFile.Value().c_str());

    // Register Instruction to be called to instrument instructions
    INS_AddInstrumentFunction(Instruction, 0);

    // Register Fini to be called when the application exits
    PIN_AddFiniFunction(Fini, 0);

    // Start the program, never returns
    PIN_StartProgram();

    return 0;
}PIN_Init函数:用于初始化,当在解析命令行时检测到一个错误则会返回true,从而执行Usage()提示命令参数信息。
PIN_StartProgram函数:在JIT模式下(默认处于该模式),开始执行插桩后的程序。
(注:PIN_Init函数必须先于PIN_StartProgram函数调用)
INS_AddInstrumentFunction、TRACE_AddInstrumentFunction、IMG_AddInstrumentFunction、RTN_AddInstrumentFunction四个函数分别对应上面提到的四种插桩粒度。
由于Pin工具是不开源的,所以也难以更加深入的研究。至于Pintool编写设计到的函数,没有必要去记,用到了再去官方文档查。我们大概通过官方给的示例知道Pin工具能干些什么就行了。
下面通过一道题来说说Pin在CTF中的应用。
0x02:Pin-In-CTF
(注:本题我也不知道大佬们是怎么想到用Pin来做的🤧,不过抛开解题的目的,拿来用于熟悉Pin也是不错的)
file一下,64位的静态编译程序,运行一下发现需要输入密码。由于验证密码的过程中,输入密码的长度和正确与否都会导致执行的指令有所不同。所以根据这一特点,我们可以统计执行指令的数目来尝试解出密码。
我对官方给的inscount0.cpp进行了修改,使其最后在终端输出结果:
tolele@u22:~/Tools/pin-3.26/source/tools/ManualExamples/NDH2k13-crackme-500 $ ../../../../pin -t ../obj-intel64/inscount_rr.so -- ./crackme
Jonathan Salwan loves you <3
----------------------------

Password: a
Bad password
Count :161131
tolele@u22:~/Tools/pin-3.26/source/tools/ManualExamples/NDH2k13-crackme-500 $ ../../../../pin -t ../obj-intel64/inscount_rr.so -- ./crackme
Jonathan Salwan loves you <3
----------------------------

Password: aa
Bad password
Count :163927
tolele@u22:~/Tools/pin-3.26/source/tools/ManualExamples/NDH2k13-crackme-500 $ ../../../../pin -t ../obj-intel64/inscount_rr.so -- ./crackme
Jonathan Salwan loves you <3
----------------------------

Password: aaa
Bad password
Count :166723
可以发现随着输入字符的长度增加,执行的指令数量也进行一定量增加,我们可以对此进行爆破,看看能不能获得什么有用的信息:
from pwn import *
last = 0
for length in range(1, 30):
    io = process('../../../../pin -t ../obj-intel64/inscount_rr.so -- ./crackme', shell=True)
    password = 'a'*length
    io.recvuntil("Password: ")
    io.sendline(password)
    io.recvuntil("Count :")
    inscount = io.recv(6)
    new = int(str(inscount)[2:-1], 10)
    change = new - last
    print("len="+str(length)+"\tinscount="+str(new)+"\t  change="+str(change))
    last = new
    io.close()
在爆破的过程中,发现process()开启进程的显示信息有些碍眼,所以这里使用grep进行了限制:
tolele@u22:~/Tools/pin-3.26/source/tools/ManualExamples/NDH2k13-crackme-500 $ python3 GuessLen.py | grep len
/home/tolele/Tools/pin-3.26/source/tools/ManualExamples/NDH2k13-crackme-500/GuessLen.py:6: BytesWarning: Text is not bytes; assuming ASCII, no guarantees. See https://docs.pwntools.com/#bytes
  io.recvuntil("Password: ")
/home/tolele/Tools/pin-3.26/source/tools/ManualExamples/NDH2k13-crackme-500/GuessLen.py:7: BytesWarning: Text is not bytes; assuming ASCII, no guarantees. See https://docs.pwntools.com/#bytes
  io.sendline(password)
/home/tolele/Tools/pin-3.26/source/tools/ManualExamples/NDH2k13-crackme-500/GuessLen.py:8: BytesWarning: Text is not bytes; assuming ASCII, no guarantees. See https://docs.pwntools.com/#bytes
  io.recvuntil("Count :")
len=1    inscount=161131   change=161131
len=2    inscount=163927   change=2796
len=3    inscount=166723   change=2796
len=4    inscount=169519   change=2796
len=5    inscount=172315   change=2796
len=6    inscount=175111   change=2796
len=7    inscount=177907   change=2796
len=8    inscount=183628   change=5721
len=9    inscount=183500   change=-128
len=10    inscount=186296   change=2796
len=11    inscount=189092   change=2796
len=12    inscount=191888   change=2796
len=13    inscount=194684   change=2796
len=14    inscount=197480   change=2796
len=15    inscount=200276   change=2796
len=16    inscount=203072   change=2796
len=17    inscount=205868   change=2796
len=18    inscount=208664   change=2796
len=19    inscount=211460   change=2796
len=20    inscount=214256   change=2796
len=21    inscount=217052   change=2796
len=22    inscount=219848   change=2796
len=23    inscount=222644   change=2796
len=24    inscount=225440   change=2796
len=25    inscount=228236   change=2796
len=26    inscount=231032   change=2796
len=27    inscount=245012   change=13980
len=28    inscount=245012   change=0
len=29    inscount=245012   change=0
爆破后发现长度为8时,指令数目大幅度增加,所以可以大胆地猜测密码长度为8。(可能是程序对长度有一定的判断,符合后才进行下一步的检验)
此外,还发现,当每输入一个正确的字符,指令数都有所增加。比如,正确密码的第一位是’A’,则A2345678是比12345678所执行的指令数多的。据此,我们可以对密码逐位进行爆破。
from pwn import *
import string

dic = string.ascii_letters + string.digits + "+_"
last = 0
dic_idx = 0
sure = ''

for i in range(8):
    for temp in dic:
        io = process('../../../../pin -t ../obj-intel64/inscount_rr.so -- ./crackme', shell=True)
        password = sure + temp + '?'*(8 - len(sure) -1)
        io.recvuntil("Password: ")
        io.sendline(password)
        io.recvuntil("Count :")
        inscount = io.recv(6)
        new = int(str(inscount)[2:-1], 10)
        change = new - last
        print("pwd="+password+"\t  inscount="+str(new)+"\t  change="+str(change))
        last = new
        if change > 2000 and change < 10000:   # <10000是为了除去第一次
            sure = sure + temp
            io.close()
            break
io.close()执行:python3 GuessPwd.py | grep pwd,最后得到AzI0wBsX,即密码。
pwd=AzI0wBsP      inscount=211893     change=-1
pwd=AzI0wBsQ      inscount=211893     change=0
pwd=AzI0wBsR      inscount=211893     change=0
pwd=AzI0wBsS      inscount=211893     change=0
pwd=AzI0wBsT      inscount=211893     change=0
pwd=AzI0wBsU      inscount=211893     change=0
pwd=AzI0wBsV      inscount=211893     change=0
pwd=AzI0wBsW      inscount=211893     change=0
pwd=AzI0wBsX inscount=215800 change=3907 该题目来源于GitHub中的pin-in-CTF,该项目里面还包含了其它题目,但涉及到Pin工具使用的内容都大差不差。
0x03:参考
官方文档:https://software.intel.com/sites/landingpage/pintool/docs/98690/Pin/doc/html/index.html
CTF-All-In-One:https://www.bookstack.cn/read/CTF-All-In-One/doc-5.2.1_pin.md
一篇很详细的文章:https://blog.csdn.net/T2777/article/details/121282703
相当于官方文档的中文翻译:https://www.secpulse.com/archives/167900.html
pin-in-CTF:https://github.com/bash-c/pin-in-CTF
↶ 返回首页